|
Intro
Why automate your lights?
Well, to be honest, most of my house is automated, so it seemed the obvious thing to do.
There are lots of benefits in automating parts of your house, lighting in particular just makes life easier,
lights coming on when you walk into a room is better than switching them on yourself! ....and because they turn themselves
on, they turn themselves off too, so you can't forget!
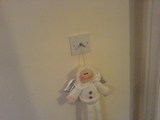
If you like the look of these pictures:


then read on...
....A little bit about this site
Clicking on any of the small images will open a larger version in a new browser window.
(try on some of the examples above)
I hope you like the site and enjoy reading about my little project.
The site is deliberately quite simple in its design, I think this makes it clean and easy to read. I try where possible
to avoid using any nasties like popups etc..
I didn't use anything other than good old notepad to design this site,
dreamweaver is great - but you don't need it...
Design
I've never been sure about X10, to be fair I've never tried it either, but my thinking is that DMX has been in used for hugely
elaborate lighting systems for years, and is known to be very robust and reliable, and that's what I wanted, so I chose DMX.
The dimmers I have chosen support both 0-10v signal and DMX, and you can use both at once if you like, this is great for me as
I've set them such that priority is always given to the 0-10v signal, so you have the option of manually overriding the settings that
the home automation system sets.
Installation
Ok, lets start at the light switches themselves.
Each room has either a double (two lights) or a single dimmer control mounted on the wall.
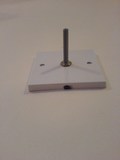
The pictures below show the dimmer control units mounted in the wall, you'll see they are still unfinished,
I'm unable to find suitable looking knobs, like the simple white ones you get on a standard dimmer,
so until I do, there are none.
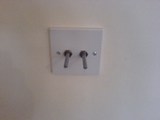
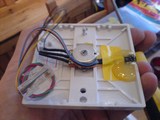
These 'control units' look just like standard UK single blanking plates with variable resistors sticking out
of the front, and that's because that is what they are!
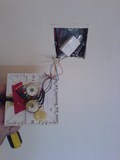
Below are some pictures showing the insides of these units:
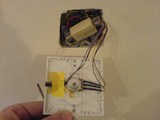
First the single dimmer.
You'll notice also that there is a small black device at the bottom of the unit:
This is a temperature sensor
that I use to control the heating, it uses the same enclosure as the dimmer units and the same run of cabling, but
they are two separate systems.
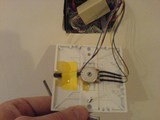
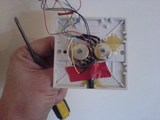
The double units are a bit more busy inside, but essentially just two singles in the same box.
These dimmer control units are connected using Cat5e cabling back to my understairs cupboard, where the rest of the kit is.
The control units (as you can see from the pictures above) can be easily disconnected from the wall by unplugging their RJ45
plug from the connector. Each dimmer location in the house has a single run of Cat5e to it all home ran back to under the stairs.
The units themselves simply act as a potentiometer, the variable resistors have 3 legs, looking from the front, the leftmost one is
grounded, the middle one (the wiper) is the output, and the right one gets 10 Volts DC.
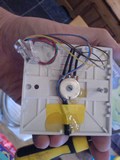
Notice the use of heatshrink sleeving and a dab of epoxy to hold everything in place, this makes for a more reliable unit I've found
Connecting them up in this way means that
as you turn them clockwise from off to on, the voltage on the middle leg rises gradually from 0v to 10v - This is used to control the
dimmer units manually.
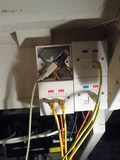
Above are some pictures of how the dimmer control cabling terminates under the stairs, I've used standard Cat5e cabling throughout
as it is cheap and good quality, I've also used RJ45 plugs and connectors for the same reasons, this lighting system has nothing
to do with ethernet, tcp-ip or the like, I'm just using the cabling and connectors normally associated with this sort of thing.
In the picture above, each yellow patch cord represents a dimmer control location, I've used the RJ45 wall sockets as a means
of connecting these cat5e runs up to both the dimmers and the temperature sensor control board.
The dimmers themselves are 4 channel units that support both DMX and 0-10v signal to control their output.
* UPDATE * (10:05 06/02/2008)
I didn't explain this very well originally, so here is some more information on how the 0-10v signal and DMX
work together.
The setting of the 0-10v signal (i.e the setting of the dimmer control unit) will
(if brighter) override the DMX setting.
This isn't ideal, as it does mean you can leave lights on by mistake, as turning the dimmer all the way up will force the
light to stay on.
However, we don't actually use the dimmer controls manually,
the lights come on automatically if it is both dark outside
(there is a light sensor in the garden) and if someone
is in the room (the PIR sensors tell the server if this is the case)
So there is never any need to turn the lights on yourself!
The other potential problem is if the system turned the light on,
and you actually wanted to turn it off, turning the dimmer control
down would have no effect either.
In reality though, the dimmer racks have a configuration switches
on them, should I ever experience a difficulty where the server did
something I didn't like, I could either flick one of the DIP switches
on the rack, or unplug the DMX lead!!
I hope this now makes more sense.
There is also a link here to the dimmer rack
instruction manual.
Which probably explains it better!
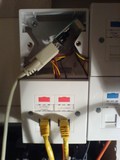
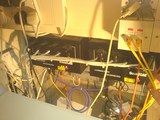
The dimmer units take the 0-10v signal on a 5pin DIN connector (1 pin is ground the other 4 represent the 4 channels) and they
take the DMX signal on a 3pin XLR connector. DMX devices can be daisy chained as each one has its own id set, if you look closely
at the picture above you can see an orange cable (0-10v signal), a purple cable (DMX daisy chain link) and a yellow cable (DMX in from the DMX controller)
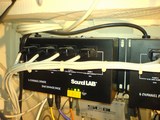
Here are some more pictures of the dimmer racks:
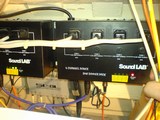
Across the front of the rack you can see a bundle of 1mm T&E cable, each one of these goes to a different lighting location
throughout the house. Quite simply this cable runs from the dimmer straight to the light fitting in the ceiling, this does make the
wiring of any light fittings very easy, as there is just a single cable to contend with. These cables are connected to
the dimmer racks using male IEC connectors (the male version of a kettle lead)
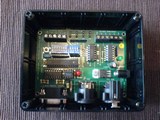
The DMX signals to control the dimmers come from the unit pictured above. This device takes a RS232 (serial) signal from my
home automation server and converts it into the DMX protocol. This allows me to control the lighting throughout the house
automatically, and means that you don't actually have to use the dimmer control units in each room, this is really the whole
point of automating the lighting, I have sensors in each room (standard security PIR sensors) that are being monitored by
my home automation system, if movement is detected then the server sends a serial signal to the DMX controller to bring up the lights
in that room etc...
Additionally it means that you can operate your lights over the internet, via SMS, IVR etc.. which can be useful.
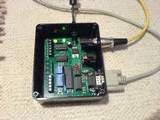
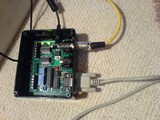
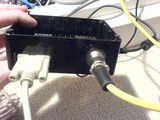
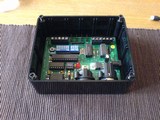
Above are some pictures of the DMX controller fitted in its box, it has three connections, power (12v dc), serial in and DMX out
There is also a link here to the dmx controller
instruction manual.

Finally a picure of the rear of the server that connects to the DMX interface, this server is used to control the DMX interface.
....More about that in the software section below.
Software
All of my other home automation (security, heating, power, cctv etc..) is written (badly in parts) using perl.
This lighting project is no different, although it does represent my first attempts at using web services.
For the web services I've used Apache 2.x and the Soap::Lite module for perl, to actually talk serial to the DMX controller, I have used the
perl module Device::SerialPort.
The whole lot runs under Redhat Linux
I call the web services from my actual home automation application like this: (note this is a part of a much larger program)
   # Lights off if no movement for ten minutes and movement more recently in the hallway
   #
   if ( $epoch - $in11_lastmove > 600 && $in11_lastmove < $in23_lastmove && $kitchenlights == 1 ) {
           &send_lights_soap(1,0) ;
           $kitchenlights = 0 ;
   }
The actual subroutine being called is here:
   sub send_lights_soap {

           $soap_response = SOAP::Lite
                   -> uri('http://192.168.101.172/Lights')
                   -> proxy('http://192.168.101.172/cgi-bin/lights')
                   -> send( "$_[0]" , "$_[1]" ) ;

           $res = $soap_response->result ;
   }
And as this is a web service, the actual serial interface and web service code resides on another machine on my network,
the web service code looks like this:
   #!/usr/bin/perl -w

   use SOAP::Transport::HTTP;
     SOAP::Transport::HTTP::CGI
       -> dispatch_to('Lights')
       -> handle;

   # Call as       -> uri('http://192.168.101.172/Lights')
   #               -> proxy('http://192.168.101.172/cgi-bin/lights')
   #               -> send("" , "")
     package Lights;
     sub send {

   use Device::SerialPort ;
   my $port = Device::SerialPort->new("/dev/ttyS0") ;

   $port->baudrate(9600) ;    $port->parity("none") ;
   $port->handshake("none") ; $port->databits(8) ;
   $port->stopbits(1) ;       $port->read_char_time(0) ;
   $port->read_const_time(1) ;

   my ($class , $channel , $intensity ) = @_;

   # send data out
   $port->write( pack "C", $channel ) ;
   $port->write( pack "C", $intensity ) ;
   sleep(1) ;

   $port->close() ;

       return "Done! I used $class with chn $channel and inten $intensity";
     }
Fairly simple code, I'm sure you'll agree, and best of all, because it runs webservices, I can spread these nodes out across my network and call them easily.
Additionally you may have noticed that like most people I've RFC1918 addressed my network, but with a suitable NAT rule, these services can easily be called from anywhere with an internet connection, meaning that I can control my lighting, heating etc.. from anywhere (even a GPRS or 3G phone!)
Conclusion
Well, I hope you've enjoyed what I've done, I love my automated lights!
Good luck if you decide to do something similar.
-Dan
Parts List
| Item |
Supplier |
Cost |
Quantity |
Buy |
| Single Blanking Plate |
Maplin |
£5.69 |
6 |
buy |
| Cat5e Cable |
Maplin |
£0.69 |
50 |
buy |
| 10kohm Linear Pot |
Maplin |
£1.21 |
8 |
buy |
| RJ45 Barrel Connector |
Maplin |
£4.99 |
6 |
buy |
| RJ45 Plug (10pack) |
Maplin |
£2.49 |
2 |
buy |
| 5pin DIN Male Plug |
Maplin |
£1.69 |
1 |
buy |
| XLR 5pin Male Plug |
Maplin |
£5.69 |
1 |
buy |
| XLR 3pin Female Line Socket |
Maplin |
£3.79 |
1 |
buy |
| XLR 3pin Male Plug |
Maplin |
£3.79 |
1 |
buy |
| IEC Male Plug |
Maplin |
£2.29 |
1 |
buy |
| RS232 to DMX Converter (item 1-463) |
Millinst |
£65.00 |
1 |
buy |
| Soundlab 4channel DMX dimmer (G018VA) |
CPC |
£58.69 |
2 |
buy |
|
|
|
|
|
Useful Links
Software
CPAN - All things Perl..
Perl.com - More things Perl..
Info
Automated Home - A really nice site
ACTIV8 Information Security - Security is Important
LANreveal - Understand your Network
LANmapper Map your Network
Suppliers
B&Q - B&Q
Maplin - Maplin
Screwfix - Screwfix
Tooled-Up - Tooled-Up
CPC - CPC
Millford Instruments - Millford Instruments
Other / Misc
FlatOutPlastering UK Get a free quote for any plastering works.
Comments
If you enjoyed reading about my project, and would like to leave a comment, please do!
I will post any interesting ones below.
COMMENTS:
---------------------------------------------------------------------------
Ross, Winnersh
What you've done is marvelous, well done!
Posted: 19:37 23/12/2007
---------------------------------------------------------------------------
Dan Massey, Bristol
You have accomplished something truly remarkable here
Dan and I applaud you for it.
It's incredible what can be achieved when you really
put your mind to it, and you deserve a pat on the back.
I think I love you! xxx
Posted: 11:37 01/01/2008
---------------------------------------------------------------------------
Andrew
I must be missing something - you mentioned the 0-10V pot
which over-rides the automation....?
So, umm, when exactly is the automation allowed to control
the light?
Does the pot set a max/min, and the automatic is allowed
to drive up to & down to this point?
Posted: 07:37 06/02/2008
---------------------------------------------------------------------------
Pieter, Belgium
Hello! A great idea.
I was looking for the same solution and through the second
hit in google got to this site.
One question, I don't understand the override of the 0-10V
function.
I also want a backup in case of server failure.
Does this mean that if there is a connection it uses the
0-10V and you have some kind of relay to connect disconnect
the 0-10V for that or how does this work?
Thank you in advance,
Pieter
Posted: 08:01 06/02/2008
------------------------------------------------------------------------------------------------
| |
Dan, Bristol
Thanks for the comments, it looks like I've not explained the
override very well....
I've made some changes to the article above to reflect this,
but in a nutshell, the setting of the 0-10v signal
(i.e the setting of the dimmer control unit) will
(if brighter) override the DMX setting.
This isn't ideal, as it does mean you can leave lights on by
mistake as turning the dimmer all the way up will force the
light to stay on.
However, we don't actually use the dimmer controls manually,
as the lights come on automatically if it is both dark outside
(there is a light sensor in the garden) and someone
is in the room (the PIR sensors tell the server if this is the case)
The other potential problem is if the system turned the light on,
and you actually wanted to turn it off, turning the dimmer control
down would have no effect either.
In reality though, the dimmer racks have a configuration switches
on them, should I ever experience a difficulty where the server did
something I didn't like, I could either flick one of the DIP switches
on the rack, or unplug the DMX lead!!
I hope this now makes more sense.
There is also a link here to the dimmer rack
instruction manual.
Which probably explains it better!
....and another link here to the dmx controller
instruction manual.
-Dan
Posted: 09:00 06/02/2008
|
------------------------------------------------------------------------------------------------
Mark McCall, Automatedhome.com
Great article! We'd love to reproduce this on automatedhome.com
Please drop me an email - and many thanks for your link back to us.
Posted: 09:20 06/02/2008
------------------------------------------------------------------------------------------------
| |
Dan, Bristol
Thanks for the positive comments, please feel free to post my article on
your site.
Thanks, Dan
Posted: 9:33 06/02/2008
|
------------------------------------------------------------------------------------------------
Simon Chram, No fixed address
I love you too!
Good luck finding those knobs (**profanity deleted**)
Posted: 09:49 06/02/2008
---------------------------------------------------------------------------
Hannes
And how about the interuptability, if your computer fails, are you still
able to switch the lights?
Posted: 11:49 06/02/2008
---------------------------------------------------------------------------
Richard, Bristol
Just wondering, when you mention that in the event of it all going haywire,
you could unplug the DMX cable, are you aware that if your dimmers adhere
to the original DMX specification that would result in the dimmers holding
their previous value rather than turning off?
Point aside, a nice little solution. Of course you could always move the
dimmers into the rooms themseleves and just run DMX cable to it rather than
multiple leads for rooms with multiple lights.
Even better, DMX over Ethernet dimmers are slowly becoming cheaper, if your
room was wired then you wouldn't need (in theory) to run any more cables.
Posted: 12:04 06/02/2008
---------------------------------------------------------------------------
Doug Parker, Orlando FL
Kewl!
...Ever thought of using sliders instead of spinners?
There is wireless DMX available. Just google search it.
No more cat5 required throughout the house, only power.
Posted: 13:19 06/02/2008
---------------------------------------------------------------------------
Henny
One idea would be to use a diffrent dmx controler, take a look at the
LCX at www.lanbox.com, it can take 8 analouge ins that can trigger &
control stuff and can be fulley triggered by tcp/ip even webpages.
See demo.lanbox.com
Posted: 14:07 06/02/2008
---------------------------------------------------------------------------
Eric
What a job!!
I would love to do this in my home. But with all four walls of cinder
block construction covered with studs and drywall. And no space in the
attic for drop lines it is impossible for me to run wire. Maybe in my
next home. Anyway fantastic job.
Posted: 16:33 06/02/2008
---------------------------------------------------------------------------
Andy
I am not sure how you this would work exactly but couldn't you do
something where you could have a switch above the potentiometers
where it would do Bypass use dmx straight. On Pentiometer and Off
turn off lights. So that you could turn off the light in like a
living room with a tv or something?
Or maybe it already does this and I am confused by what overrides what.
Posted: 18:49 06/02/2008
---------------------------------------------------------------------------
Andy
Wow.. That's cool!
Posted: 22:12 06/02/2008
---------------------------------------------------------------------------
Steve Hunt
This is truly a remarkable solution. And the use of the web service
is going to be so fun and flexible to work with. I think I understood
your explanation of the pot override. But you've suggested yourself that
it doesn't do much overriding. I would if I were ever to do this myself,
try to use the pot as a sort of switch for the override... The pots on
hifi's have a notch in the middle of the turn to confirm that you are
center balance or half volume or whatever. If you could get the server
to understand that that meant it can do it's overriding when the voltage
is at that level, otherwise obey the override, then that would be a great
way to overcome this.
Thanks for a great writeup!
I was pointed here from the MAKE blog.
Posted: 05:49 07/02/2008
---------------------------------------------------------------------------
|
|
|